
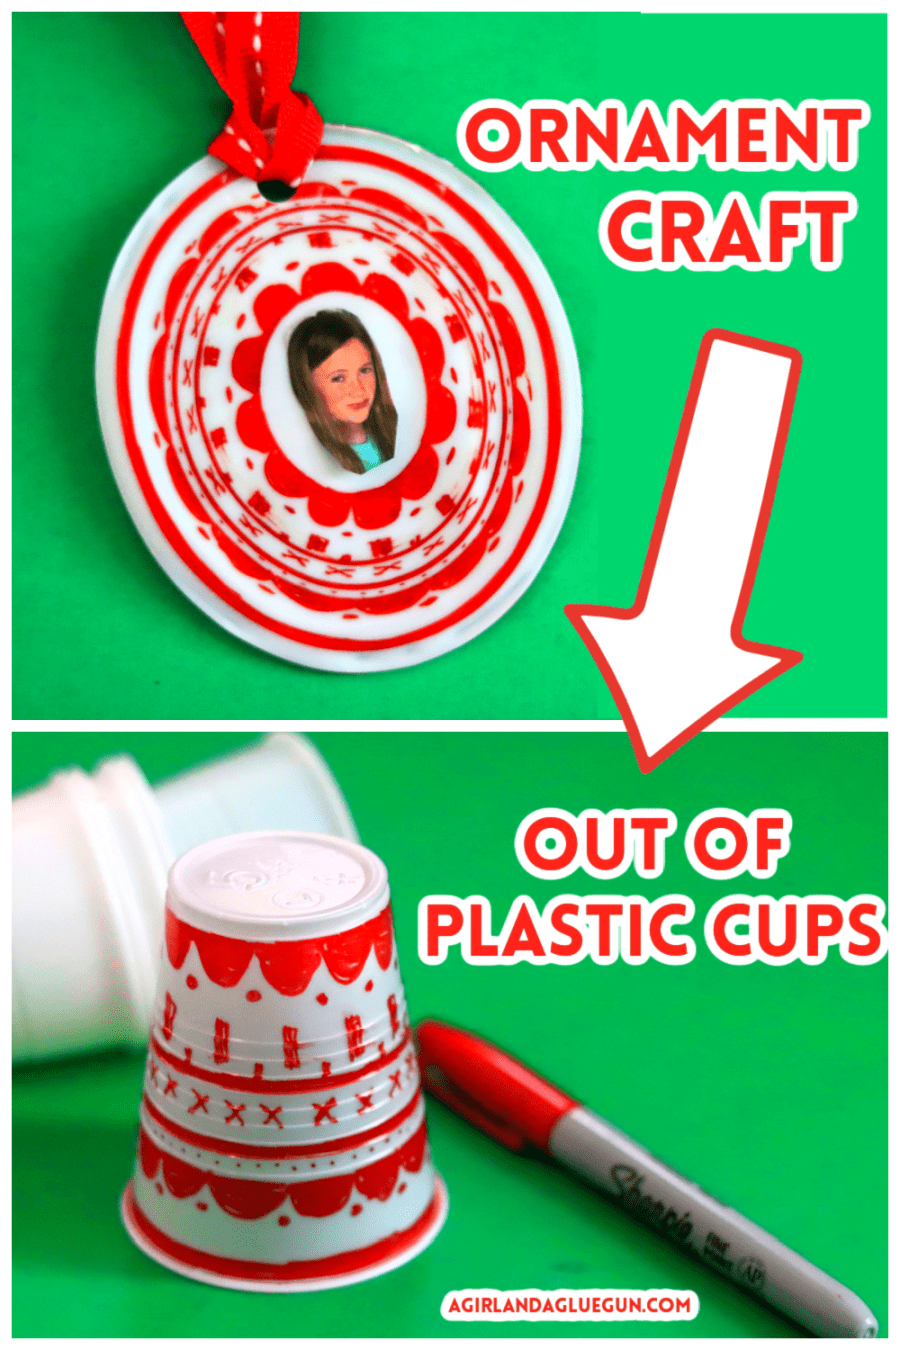
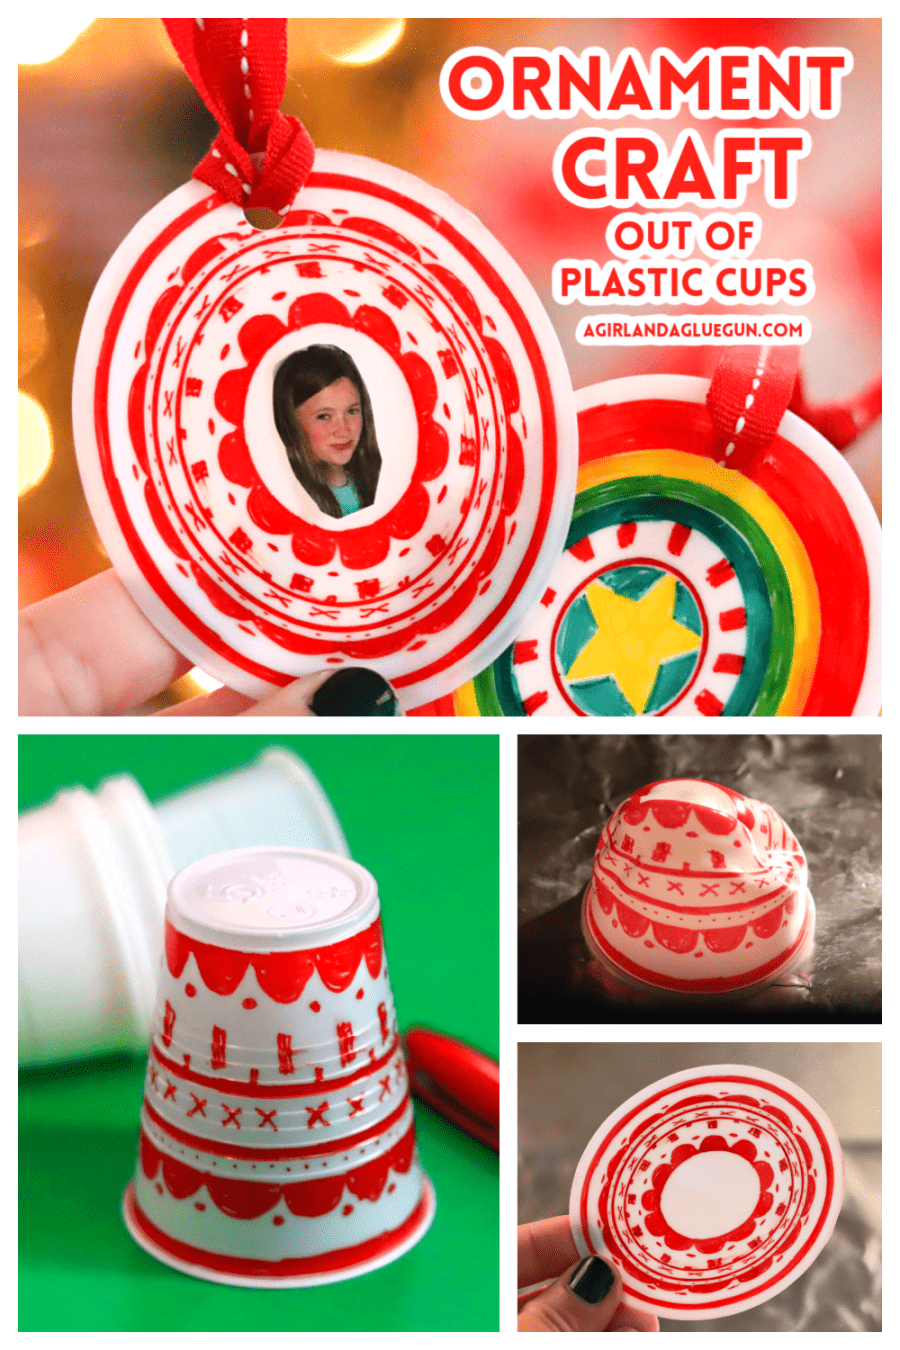
Check out this ornament craft for kids using PLASTIC CUPS! This is the coolest project that kids will love to make for Christmas.
I saw this amazing idea on tik tok. This teacher makes these each year with the kids in her classroom for them to give to their parents for Christmas! It’s just the coolest project so I had to try it out! It reminds me a lot of doing shrinky dinks growing up!
Disclaimer. Always be mindful when melting plastic. It may give off unsafe fumes. This project has no smell at all when melting- but that doesn’t mean the fumes aren’t there!
Supplies to make A Plastic Cup Christmas Ornament
- Plastic cups I used 5 oz because that’s what I had. 7-ounce- 12 ounce cups would probably be the perfect size for ornaments. 12 ounce cups
- sharpies (or other Permanent Markers)
- oven
- cookie sheet covered with tin foil
- hole punch
- ribbon
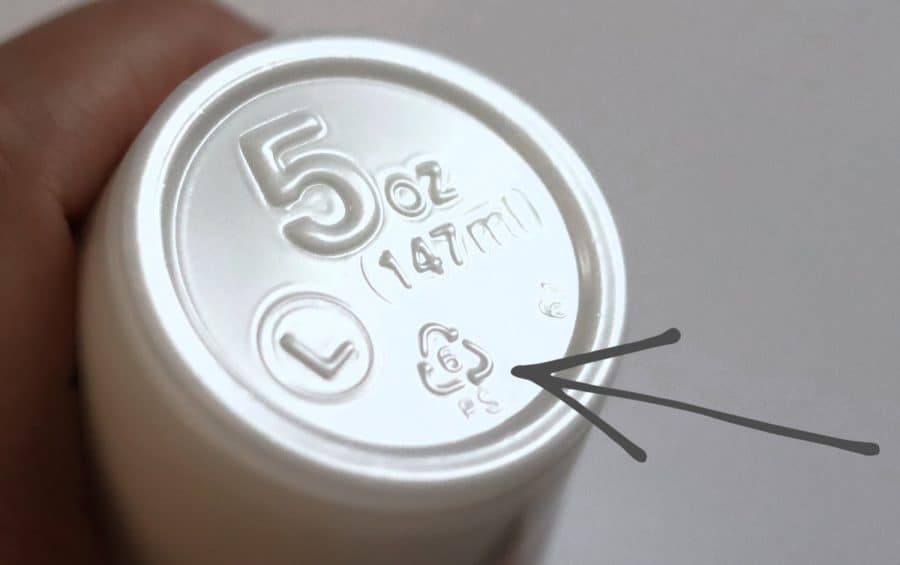
The plastic cups are key. You need to purchase ones that have the 6 symbol. This plastic essentially melts like shrinky dink material!
Check out my hot rocks project! Another fun satisfying craft that kids will love!
How to make a Plastic cup Ornament craft for kids
Step 1: Prep the area
Set Oven to Broil setting. Middle rack. Cover a cookie sheet with tin foil. I have a certain pan that I use with my crafts because I don’t really like to mix crafts and food!
Step 2: Decorate
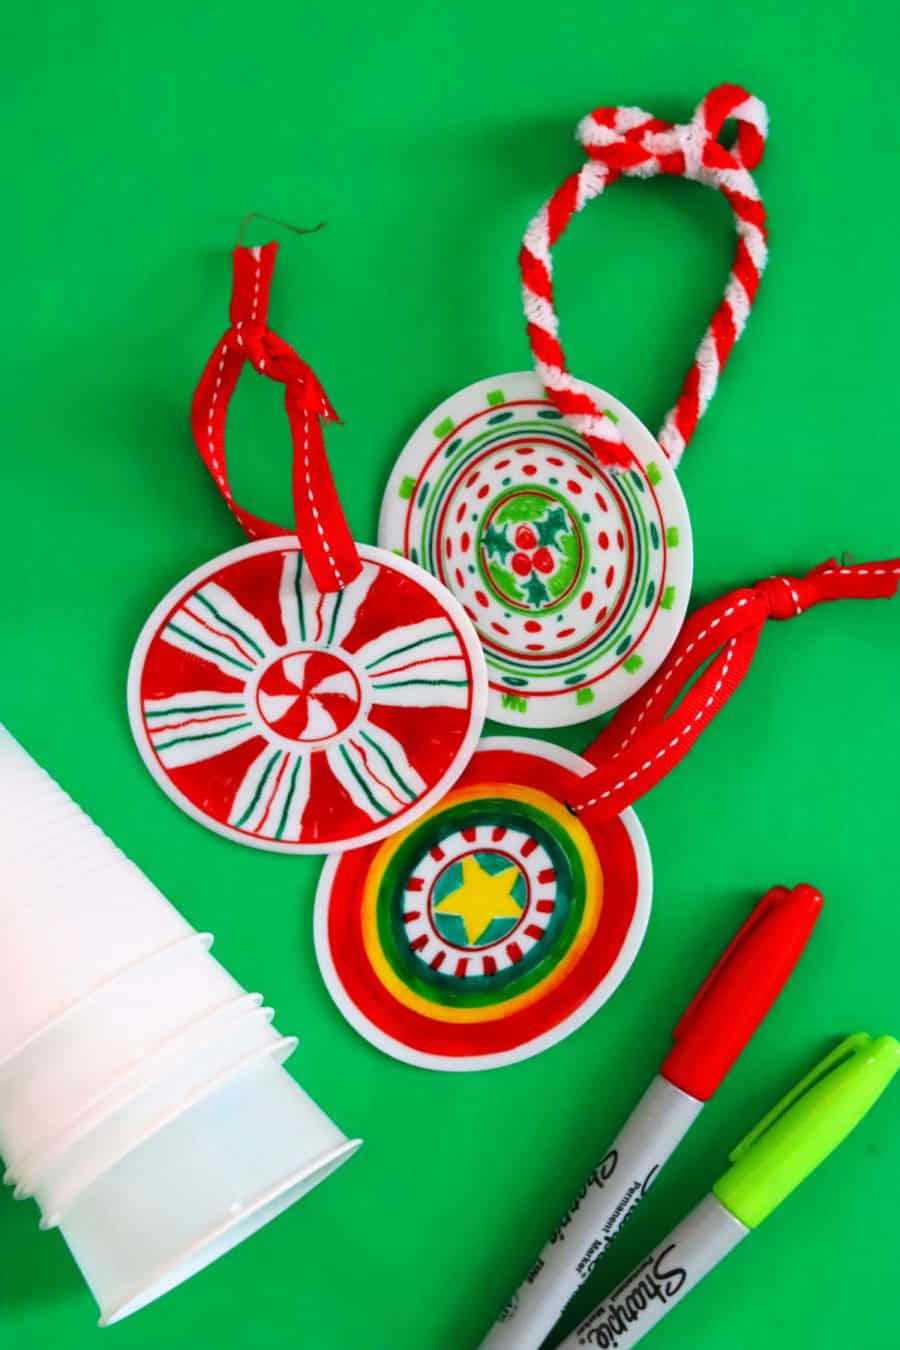
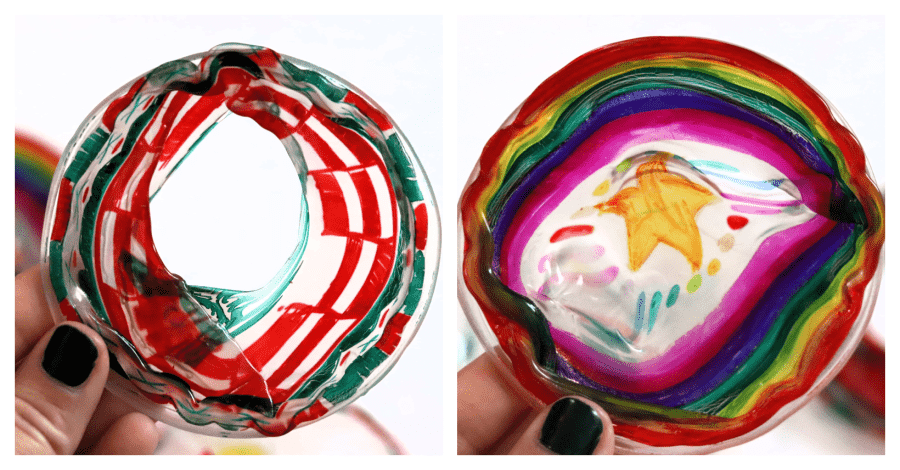
Time to draw your design. The way these cups melt, you really can see all the designs- just smaller! So spend some time and really decorate them! Kids really can show off their creativity here!
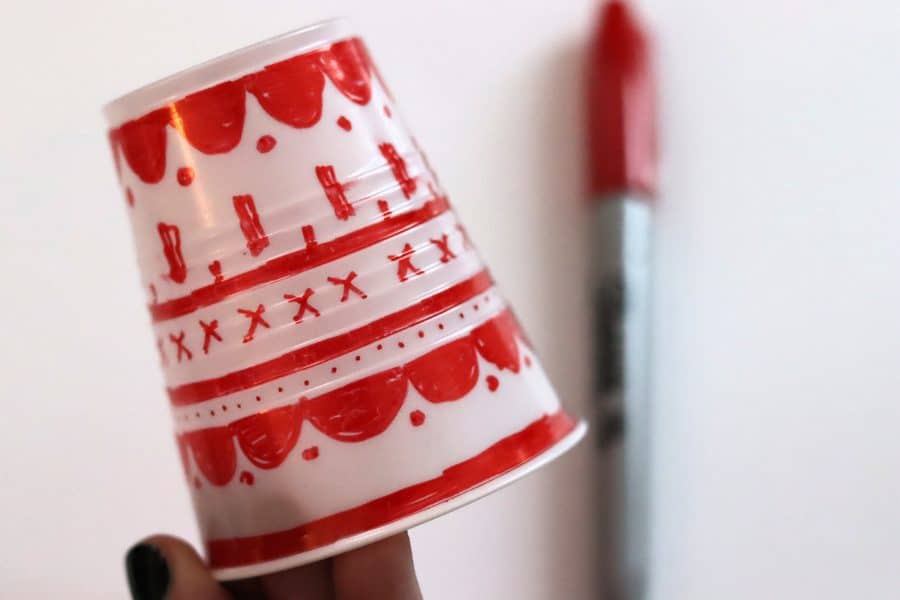
You want to decorate the sides and the top. You do not need to worry about the inside unless you want it be double-sided!
Step 3: Melt into ornament
Place cups face down on the cookie sheet and place in the oven. These will start to melt within about 5 seconds so keep your eye on them! These only take about 30 seconds in total. They will bubble as they fall flat.
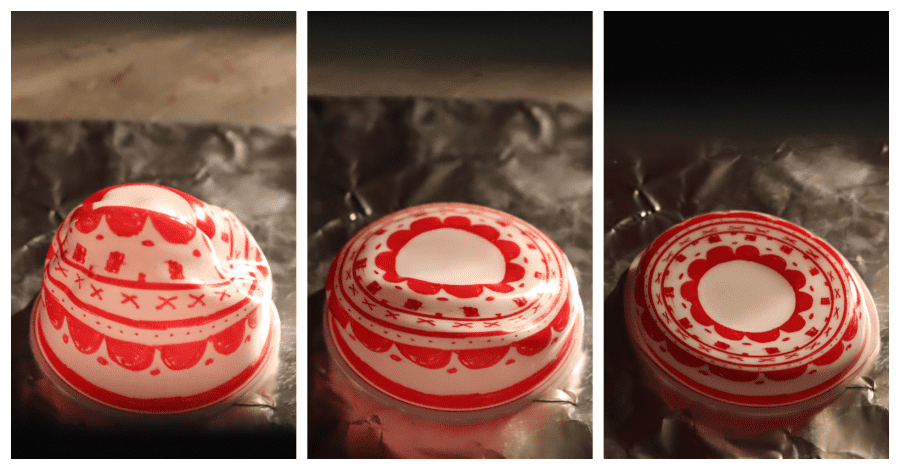
Immediately after taking out of the oven, I press a metal or porcelain bowl with a flat bottom on top of them. It presses out any wrinkles or curves!
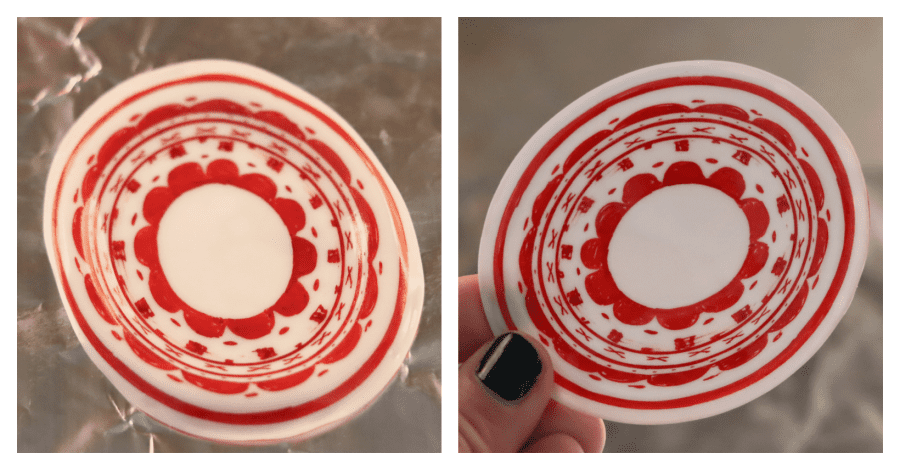
Step 4: Cool
Let cool. This luckily only takes a couple of minutes!
Step 5: Add extra embellishments to your ornament
You can add extra embellishments if you want. The tik tok I watched added in names and dates since these were kid gifts to their parents!
You can totally leave the top part empty and not color it in and then glue on a picture to the front to essentially make a frame! I added some photos- Just cut them out and glued them right on the cup!

Step 6: Ornament Hanging supplies
Take your hole punch and add a hole. It pops right through. Add in ribbon, string, or yarn to hang on the tree!
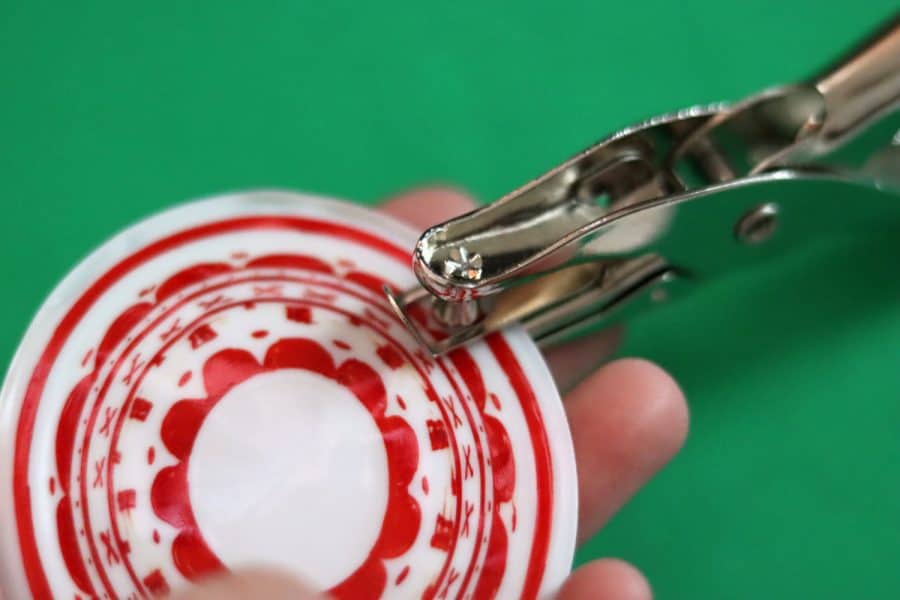
It’s really that easy But REALLY that COOL!

adaptation to the craft:
We used this same technique and created keychains! (Basically, we wanted to do this in summer!)

We used 5 ounce cups since we wanted them a little smaller.

The only other thing we did differently was to seal the keychain with a clear mod podge or sealant. There is a lot more wear and tear since you are using these versus hanging on a tree!

Troubleshooting and Questions on how to make these ornaments:
Does it have to be a specific size for cups?
We did ones that were 5 ounces for keychains- and they worked fine. We also did some that are 16 ounce. Those were a fail! They were so big so they curled and melted the top before they went flat. I know they make a 9-ounce and 12 ounce and I bet they would work as well! But that’s as big as I would go. The ones I linked are 12 ounces and I’ve heard people say they work great! I’ve also heard the brand Polar melts pretty well.
These are what the 16-ounce cups looked like when melted!
Does it have to be sharpie?
You are drawing on plastic. So any removable marker is just going to make a mess. It doesn’t have to be a sharpie brand- but definitely use a permanent marker.
Do you need to spray the tin foil with nonstick?
No. The ornaments do not stick to the tin foil.
High Broil or Low broil?
My oven only has one setting of broil. But it’s 500 degrees so hopefully, that helps! Middle rack!
If you are using a different size or not sure if the plastic cup you are using will melt- Just throw it in the oven and see! Don’t draw on it. That way you can check if your oven is hot enough, your rack is in a good spot, or if the cup is a correct size or correct type of plastic!
Does it smell?
I did not notice any smell at all!
Save for later
Too busy to get crafting today? No problem! Pin this post to remind yourself about this project later! Sharing my projects helps me reach more people, allowing me to continue sharing free content!
The BEST kid crafts and activities
and when I say kids, I mean kids of all ages!
- black glue art
- salt art
- hot rocks
- Yarn bracelets
- DIY window clings with puff paint
- Play dough activity mats
- Melted crayon art
- magic wallet
- Learn to make black scratch paper
- Melted Crayon Suncatcher
- Pressed Flowers Jar
- Bleeding Tissue craft
If you are looking for more fun kids’ crafts- my craft camp has two weeks full of fun projects that you will love to do as well!
Sherry says
Absolutely love this
Kavita says
Hi. I don’t own any cookie sheet can I just use a normal foiled tray?
Would it still work?
Kimbo says
yes! It should still work!
Barbara says
Just tried this out and it came out wonderful!! Used the 5oz cups and they are a good size ornament. Doing this with my grandson this weekend!! Thanks for sharing!!
Janette says
Love this idea. We have Breakfast with Santa and this will be a perfect craft. Thank you!
Zoe says
Great idea
Teresa says
WONDERFUL IDEAS
Ann says
Love this idea! I will be trying it with my two great granddaughters
Christine says
Great idea 💡 I plan on making these with my grandkids. Thank you
Sharin says
Cant wait to try this for some family fun
Sandra says
Thank you for sharing. I’ve been desperately searching for something fun to do with my grand girls, this weekend. They will love this!
Paige says
Loves this idea absolutely beautiful. My daughter n I made some earrings
Gloria Short says
So clever! Gotta try them!
Donna Scarberry says
This looks like a project that kids would really enjoy. I think that we may have to try this.
Candace says
Where did you find the cups? We found some with the 6 but they did not shrink correctly at least on first try. Can you give ideas of where to get and or brand please.
Kimbo says
https://amzn.to/3UY0XJ1
Cristina Miller says
How did you do the picture? I have no clue how I’m going to get the answer to this and see it. But I am really interested in doing this!
Kimbo says
I just cut it out and glued it on!
Tessa says
OMG these are adorable can’t wait to make these.
Traci says
Can’t wait to try this!!!
Tiffiney says
I cannot find the cups with a 6. They all have a 5.
Kimbo says
https://amzn.to/3UY0XJ1
Melissa D says
Walmart has them they are 5oz it’s a great value bag of them for $3 it has a large 5 to show the ounces then at the bottom in a triangle there is a #6 they work perfectly ! Great value plastic cups
Roxann Petzold says
Can’t wait to do this as a Christmas dinner project with the kids.
Sandy says
I loved Shrinky Dinks! I’m 59 I love this! I’m going to make some.
Karen Boedeker says
Hi! Where can I buy the plastic cups with the 6 symbol?
Kimbo says
https://amzn.to/3UY0XJ1
Kim Rhodes says
I purchased 9oz plastic cups at Dollar Tree. There are 26 for $1.25. I purchased 3 pkg, enough for my 25 students to make 3 each
Rip says
I’m having a hard time finding the right cups. Where can we get these cups? Who sells them?
Thanks
Kimbo says
https://amzn.to/3UY0XJ1
Crystal McCool says
I found mine at dollar general
Arlene Applebaum says
This looks really awesome! I’m going to try this with the grandkids! Also sending it to my teacher friends. Thank you for this idea!
Carrie says
Where did you buy number 6 plastic cups? I’m having a hard time finding them.
Kimbo says
https://amzn.to/3UY0XJ1
Rita Roberts says
Love this idea, I am going to try this with my grandkids when they come down for Christmas . Thank you!!
Ivory says
Thanks for the great easy idea. I used 8oz cups and they came out oval instead of round as your 5oz cups did.
Sallyann says
We’re they cute though? I was thinking about going a size up.
Lori says
Strange question…Does it smell when you melt them?
Kimbo says
No it doesn’t!
Sue says
Made these with four kids today. From grade school to high school. They all enjoyed making them (everyone made 2). Parents enjoyed making them too. We had the broiler on low (be sure to preheat!). They came out oval. You could clearly see the design on them. One child wrote words and turned out neat! Will be doing this with another group soon!!
Sheri says
Does this with my grands, ages 3 and 5, tonight. Our cups were #5. Didn’t melt perfectly round. But, we had fun and the kids loved watching them melt with the oven light on. Going to find #6 cups and try again.
Shannon says
OMG love this we had a blast… 8 yr old 2(6yr olds) & me 47 !!! We all had fun😜
Kristi Nering says
This is such a cool project, but no matter what we did we couldn’t consistently get them to be flat and round! We had the exact cups from the demo, but there was still lots of frustration and experimentation. We ended up compromising when we finally discovered we were at the mercy of how the cups were melting in the oven. Luckily the kids were excited at the finished projects regardless of the frustration of the adults.
Lynn says
I made these with my grandson last night I used a 12oz.cup, I think that’s a little to big. I’m going to get smaller cups. Some rolled after I let them get flat. My grandson had a good time making these. We’re going to try again!!
Jennifer James says
This is so neat & fun