
The perfect indoor activity for your kids when it’s chilly outside! Easy DIY mat with yard activities, including everyone’s favorite, Hopscotch!

Jump Into Fun: The DIY Indoor Hopscotch Mat That Brings Playtime Inside
Remember the days of drawing hopscotch grids with chalk on sidewalks and spending hours hopping around in the sun? Now, imagine bringing that same classic game indoors—no chalk, no weather worries, just pure fun. Enter the indoor hopscotch mat: a playful, portable solution that brings this timeless activity into your living room, classroom, or playroom. Whether you’re a parent looking for an engaging activity on a rainy day or a teacher adding movement to your lessons, this DIY indoor hopscotch mat is a fun and functional way to promote active play, balance, and coordination—all while keeping the kids entertained.

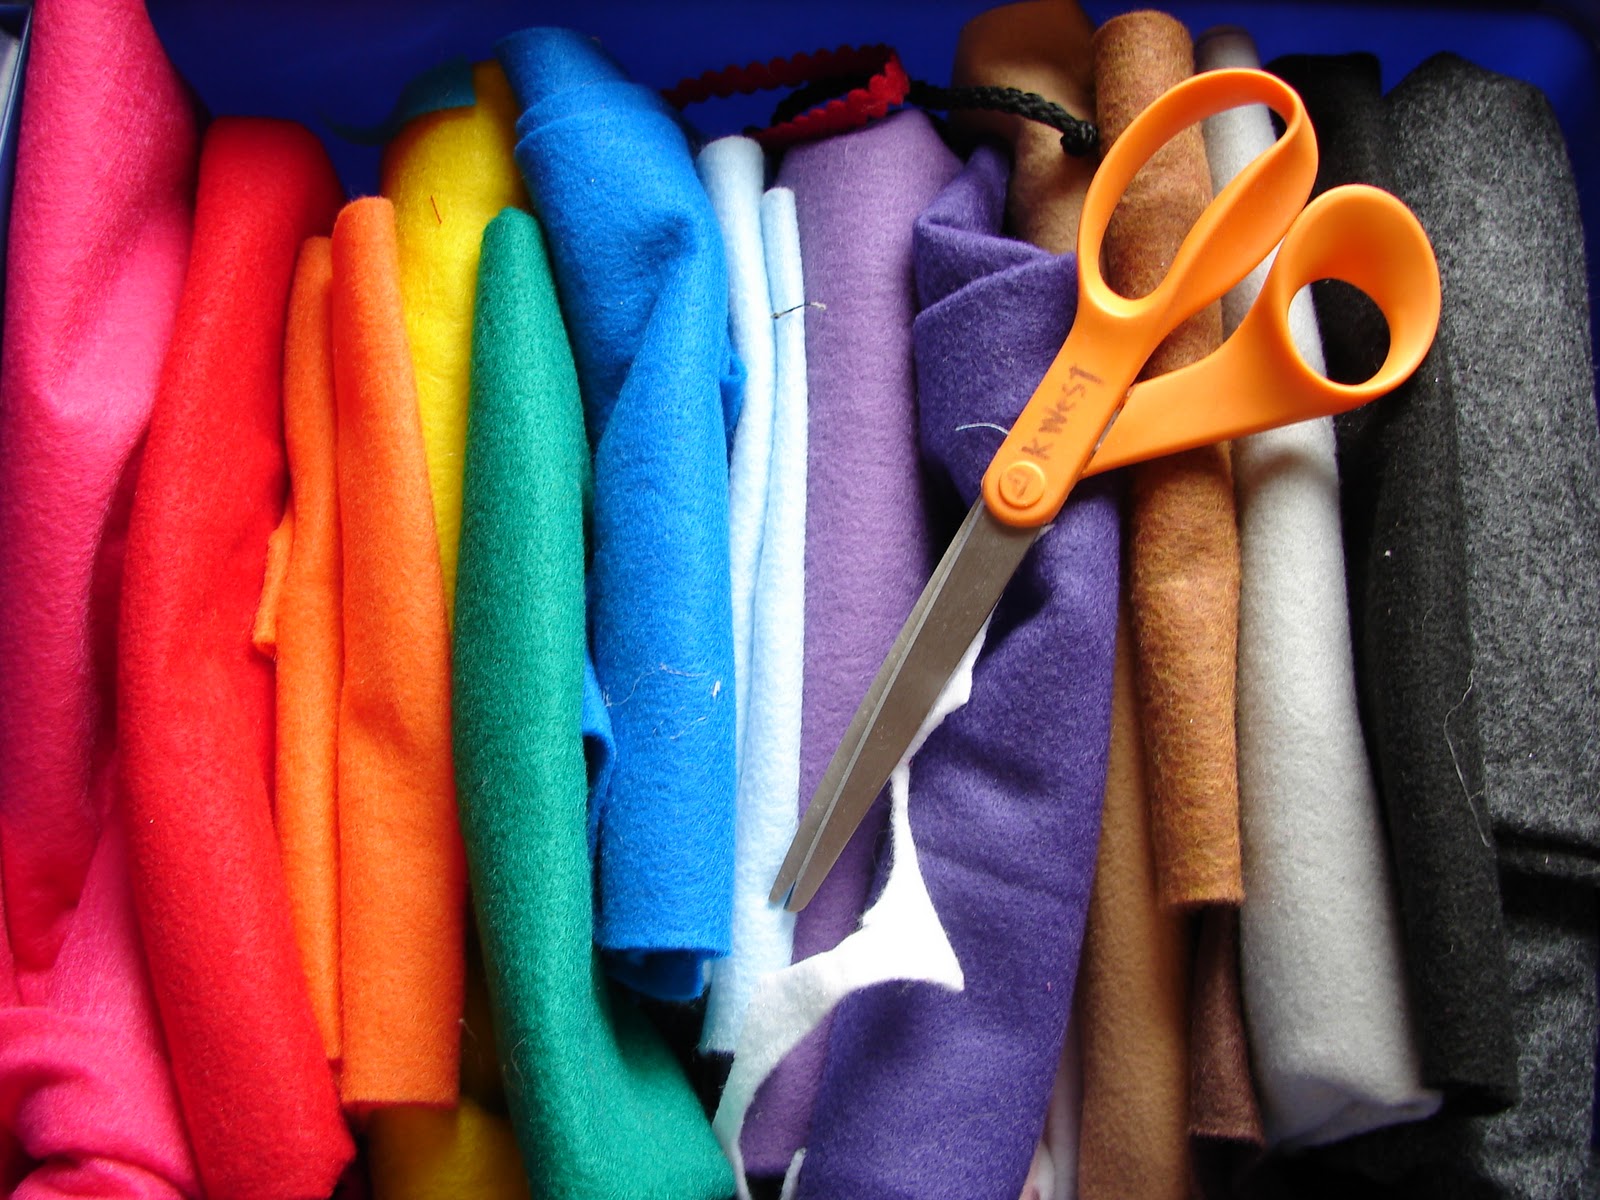
Supplies for your portable hopscotch mat
- White canvas
- Hot glue
- Felt sheets
- Sharp scissors
- Rocks
Home depot had the drop cloths but I’m sure Hobby Lobby also has it! I got my felt squares from Hobby Lobby as well.


I have quite a collection of felt….so I cut whatever colors I needed to size
Sidenote: when working with felt…sharp scissors are your friend.
Getting started on your hopscotch mat
I was on the fence about whether to hot glue stuff to it or paint but I finally went with hot glue- I mean, I’ve got to live up to the name, right? If you want to go the paint route, It should be easy to do (as long as your canvas is thick enough) or you could even sew fabric…but those methods require a bit more work.

I bought two yards and cut it in half…but that makes two mats … so you could just buy one yard and sew the ends together to make one long mat (does that make any sense at all? Basically, you want one long piece of fabric…by any means necessary).
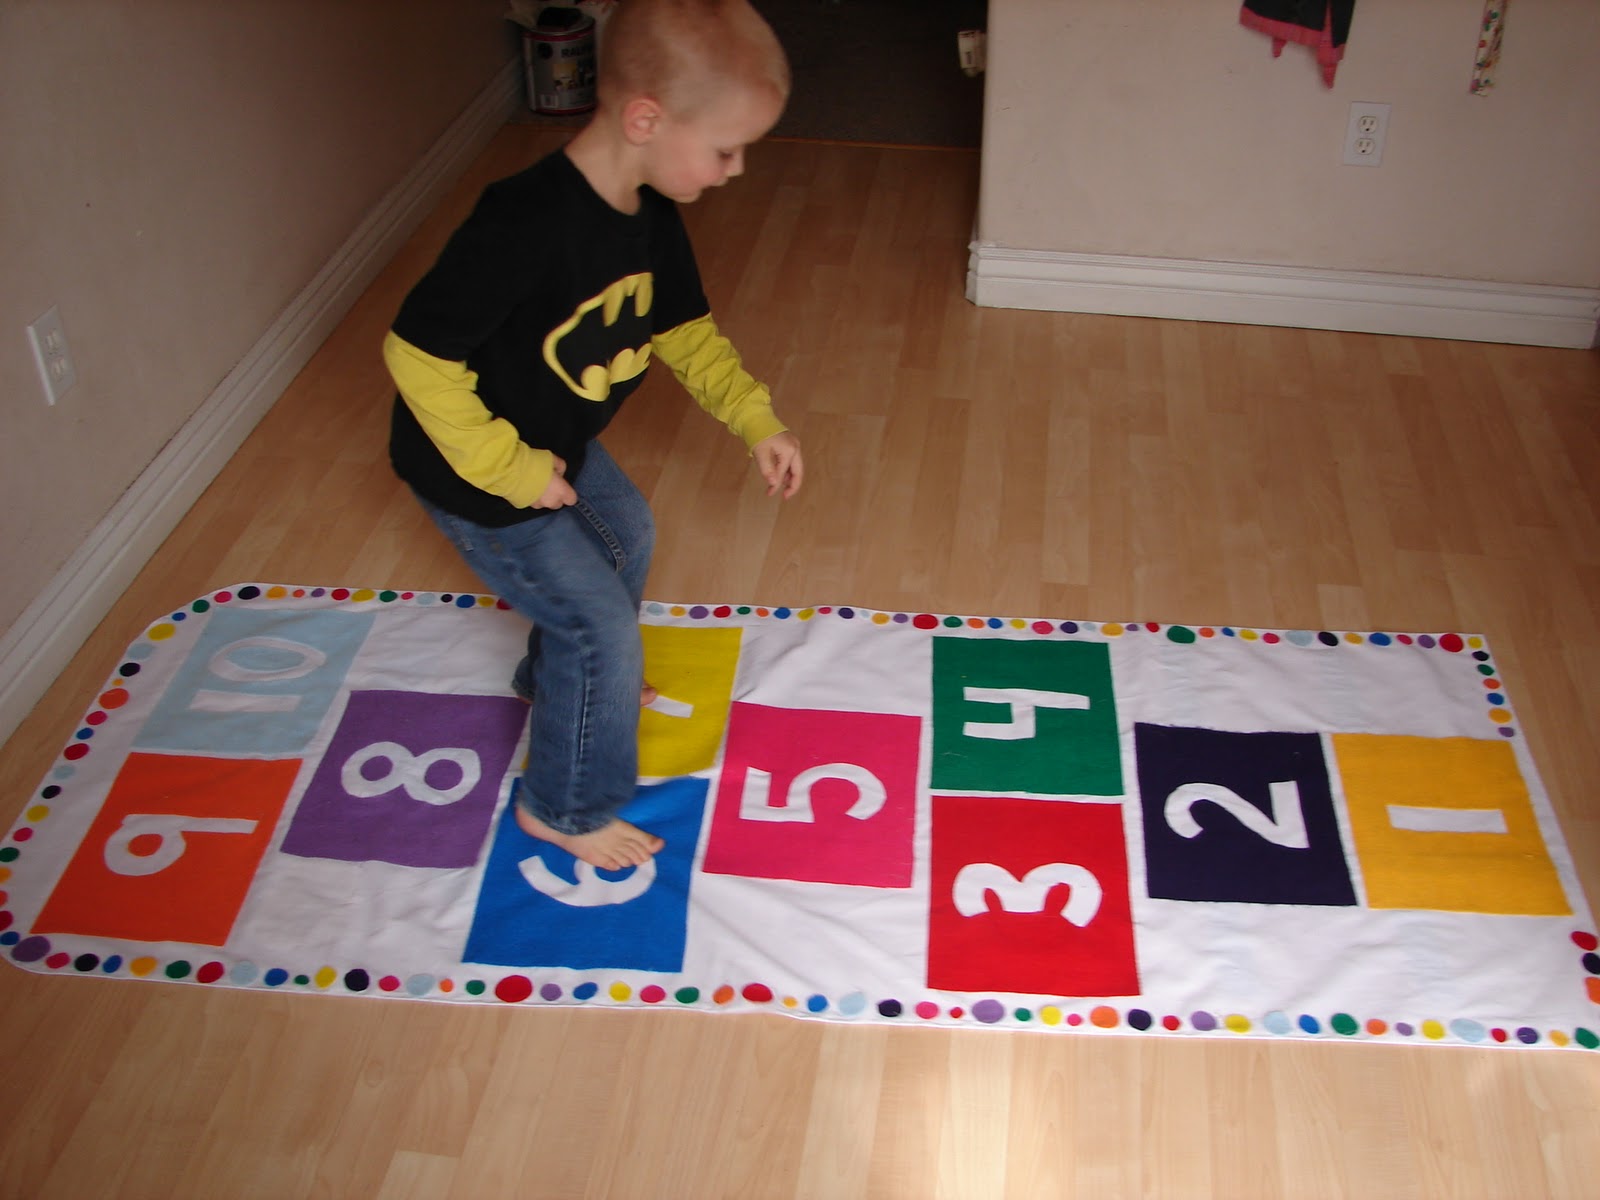
Step 1: Laying it out
I had my kids help lay out the felt sheets and put them in the pattern they wanted.
My youngest tested out jumping onto each square.

Then my other cute little “helper” helped with taking off the stickers on the felt sheets and also try it out.
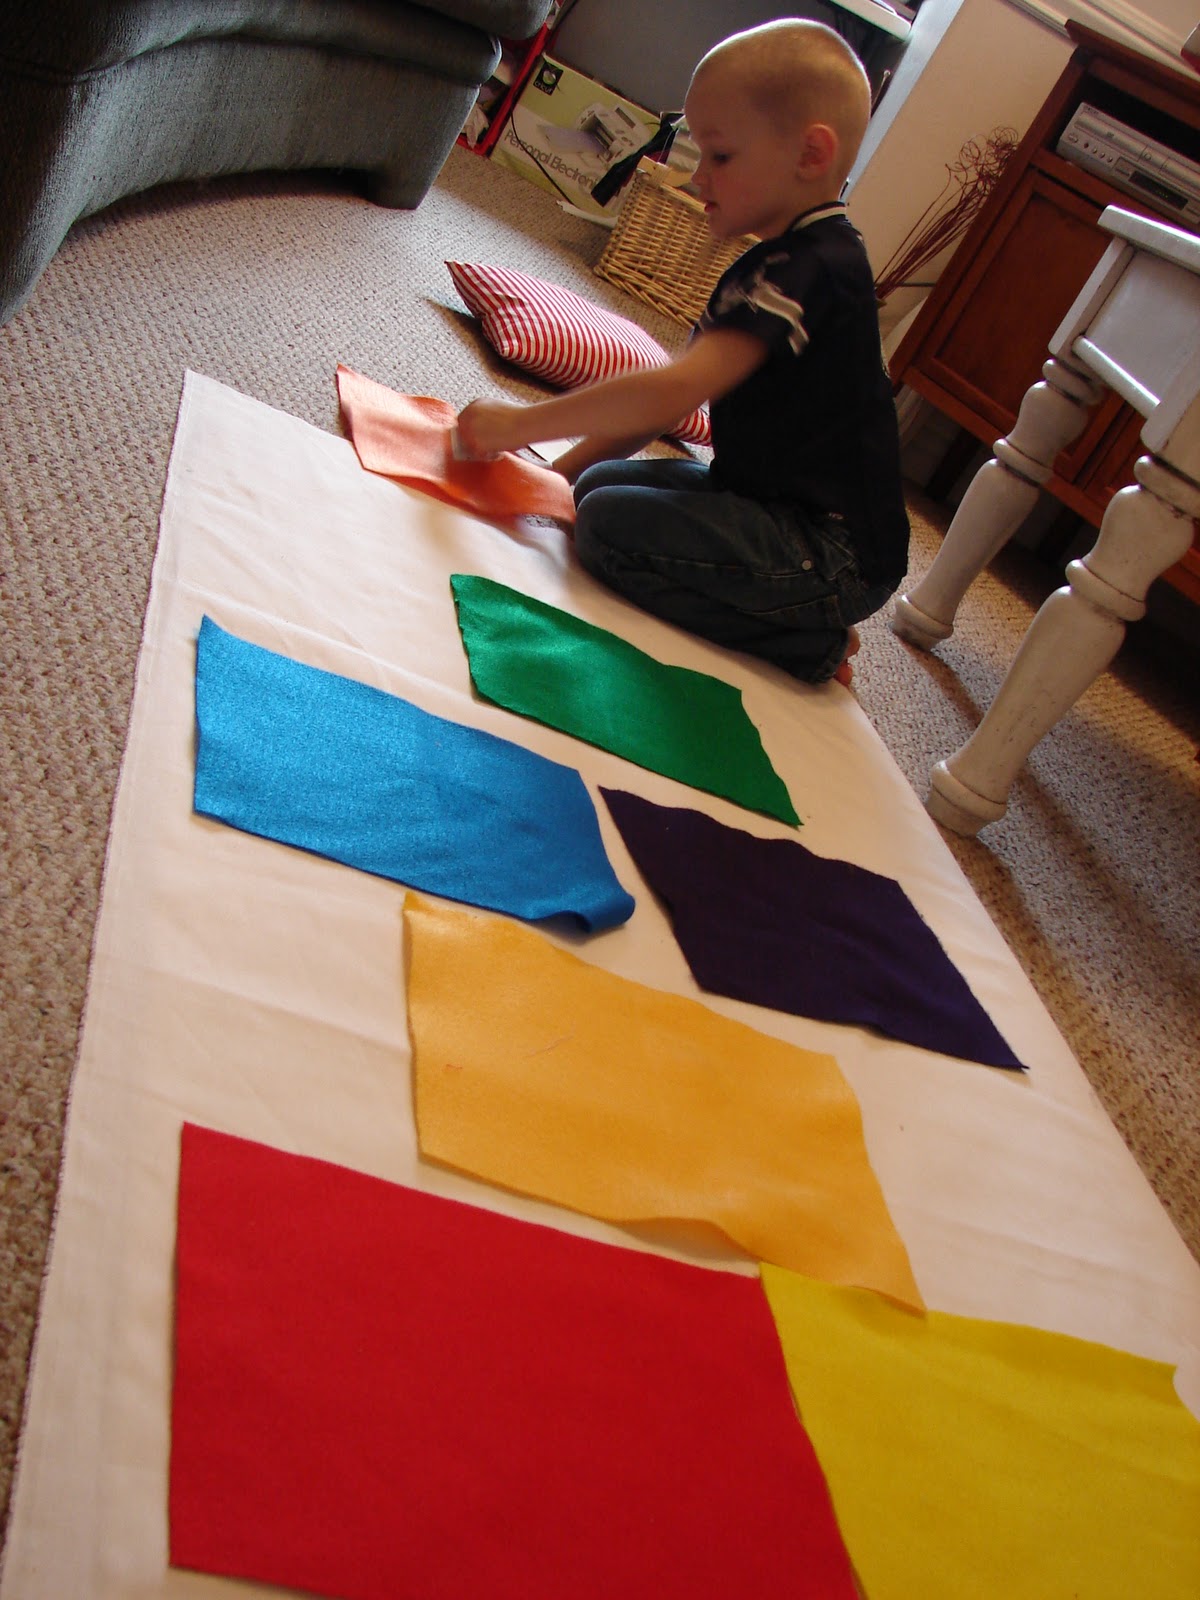

Lastly, I had my oldest lay it out exactly how she wanted the colors to be.
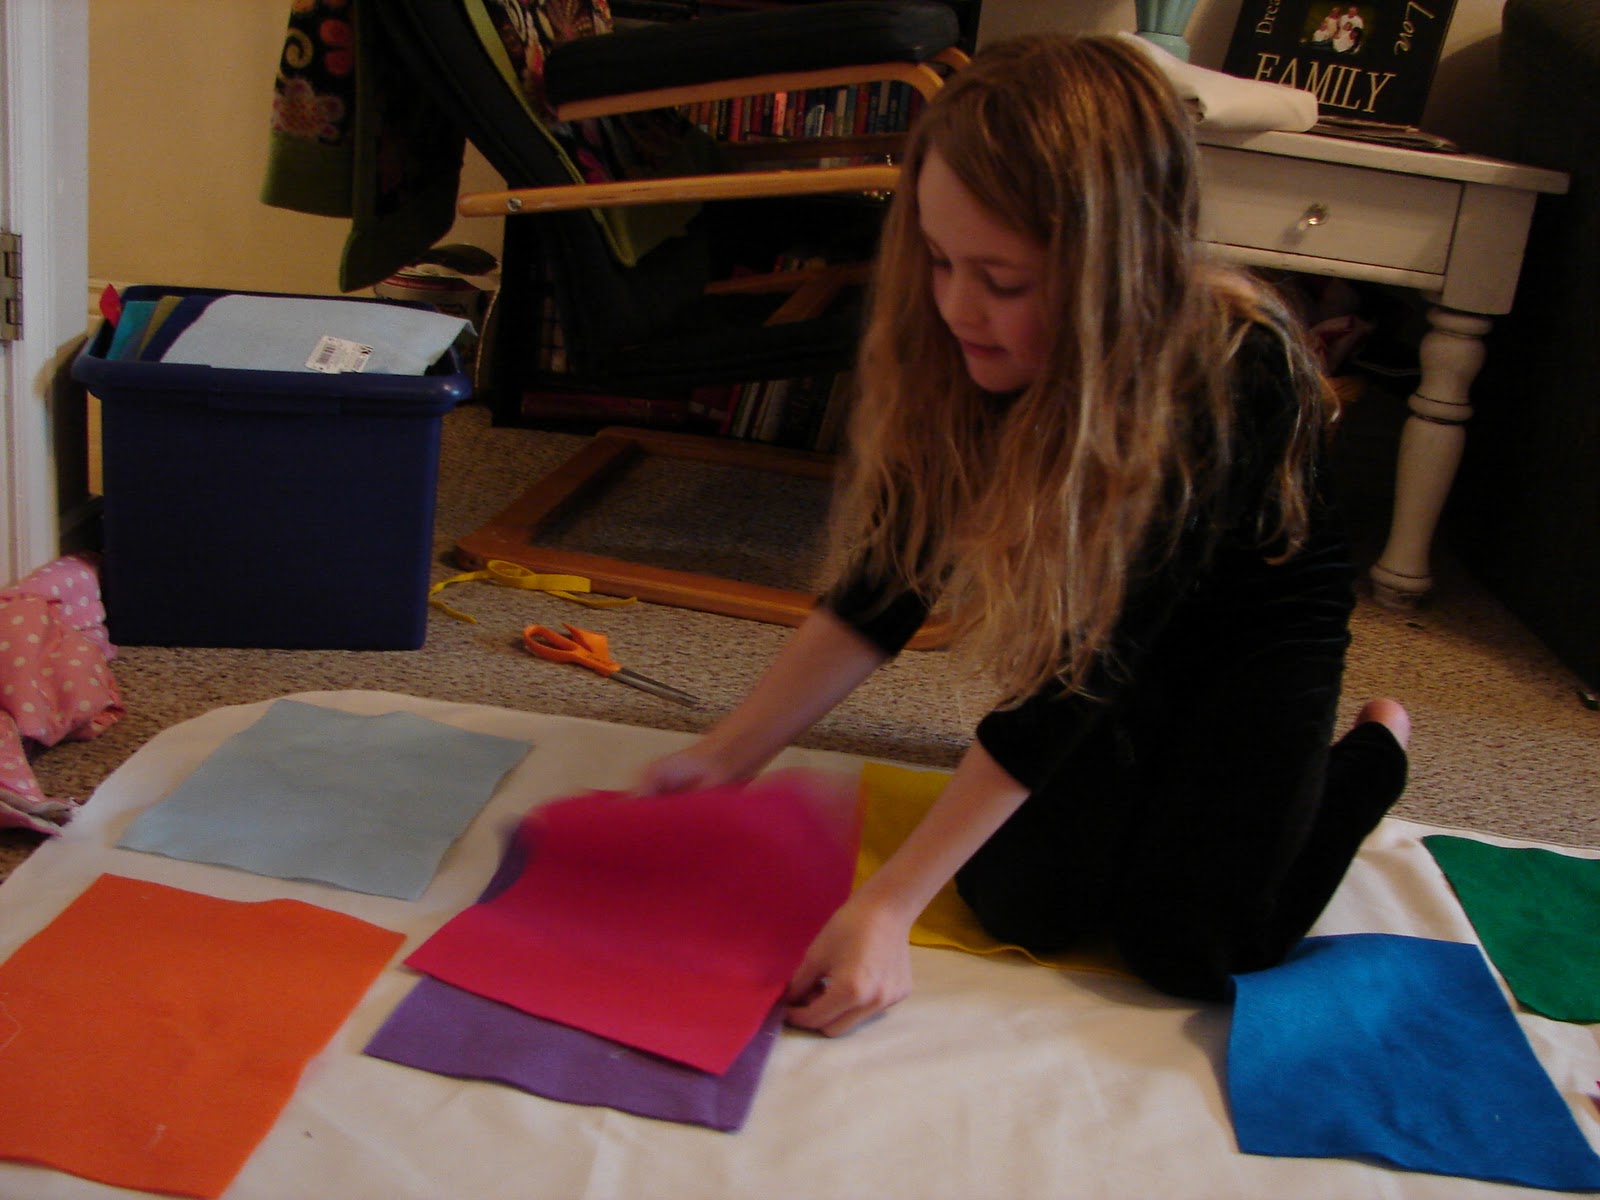
With the weather so chilly here in Idaho, my kids were desperate for entertainment! This is such an easy way to get your kids to participate in this craft and “make” it with you!
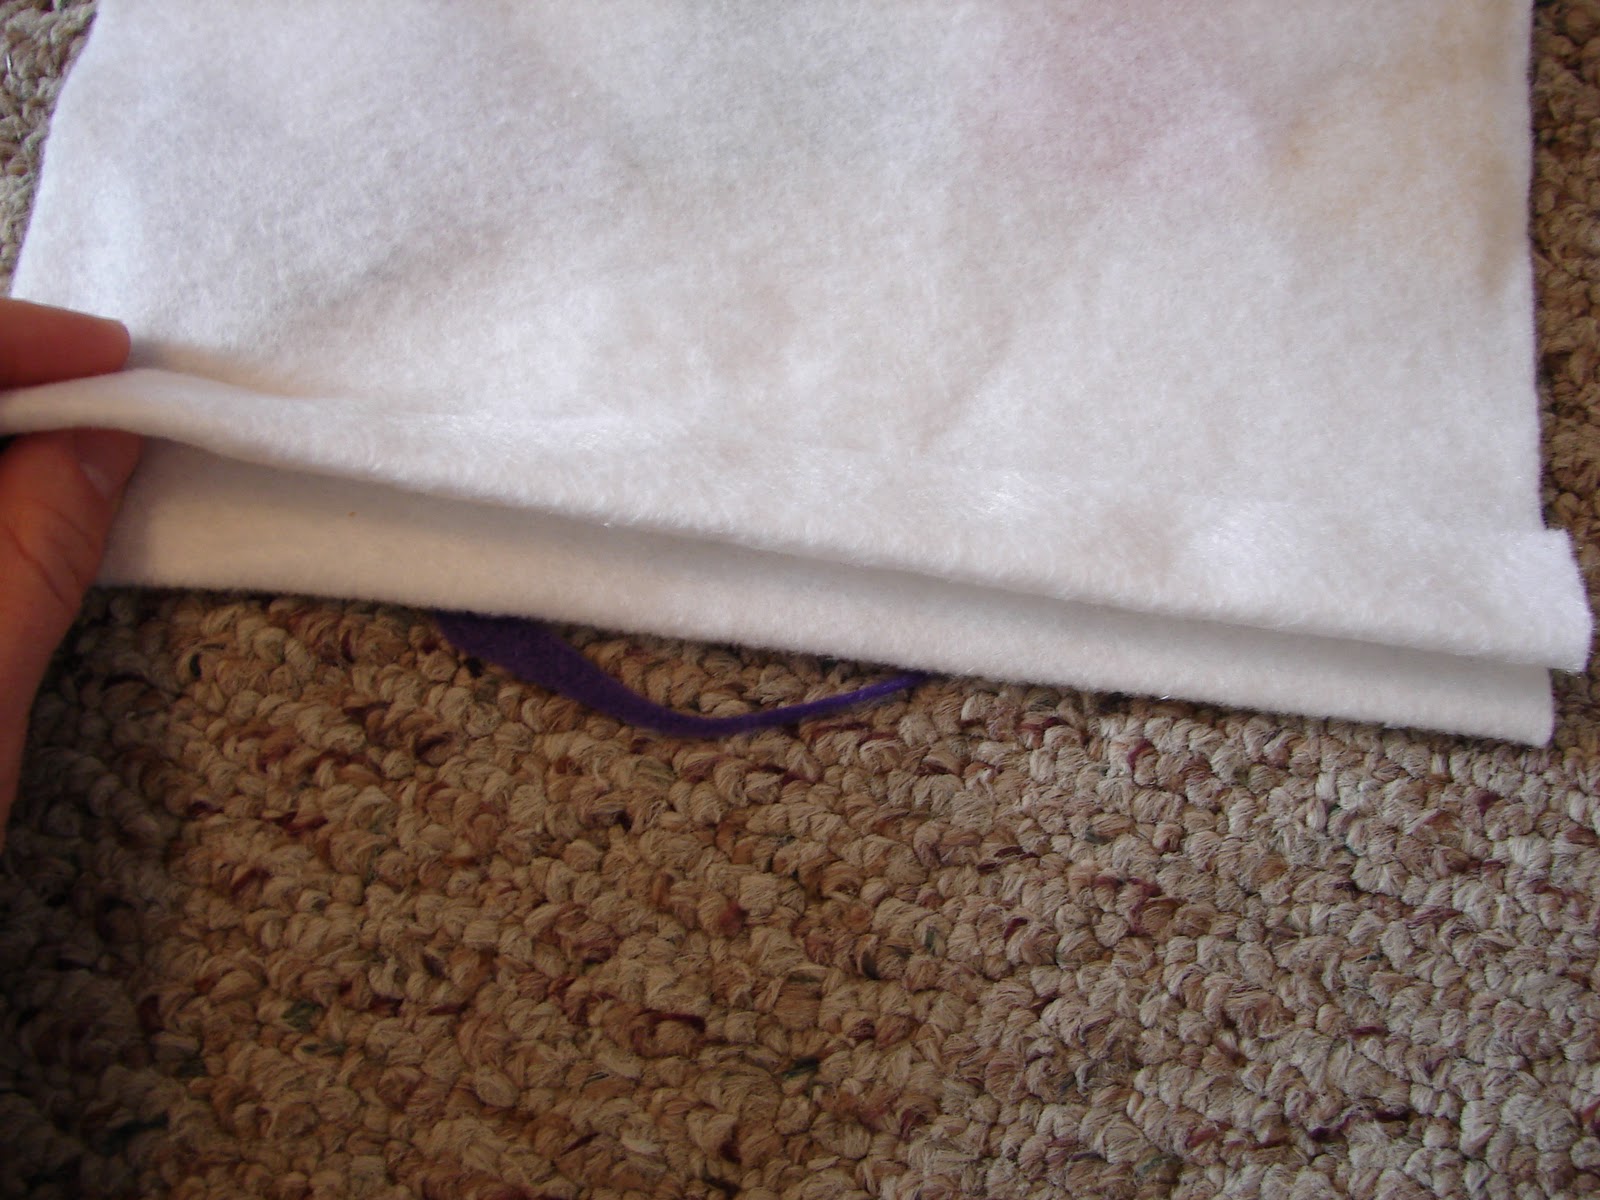
Step 2: Cutting and hemming your indoor hopscotch mat

I folded the mat in half and rounded the edges of the top part of the mat

Then I hemmed the edges with hot glue. You can also stitch this if you would like.

Step 3: Cutting your felt numbers
I took my felt pieces and traced the numbers with a marker and cut it out. You can also use a stencil here to get a more precise sharp look.


After I have all my numbers, I hot glued the felt right onto the canvas. Make sure all the edges are glued down nice and tight seeing how there is going to be a lot of jumping on it.

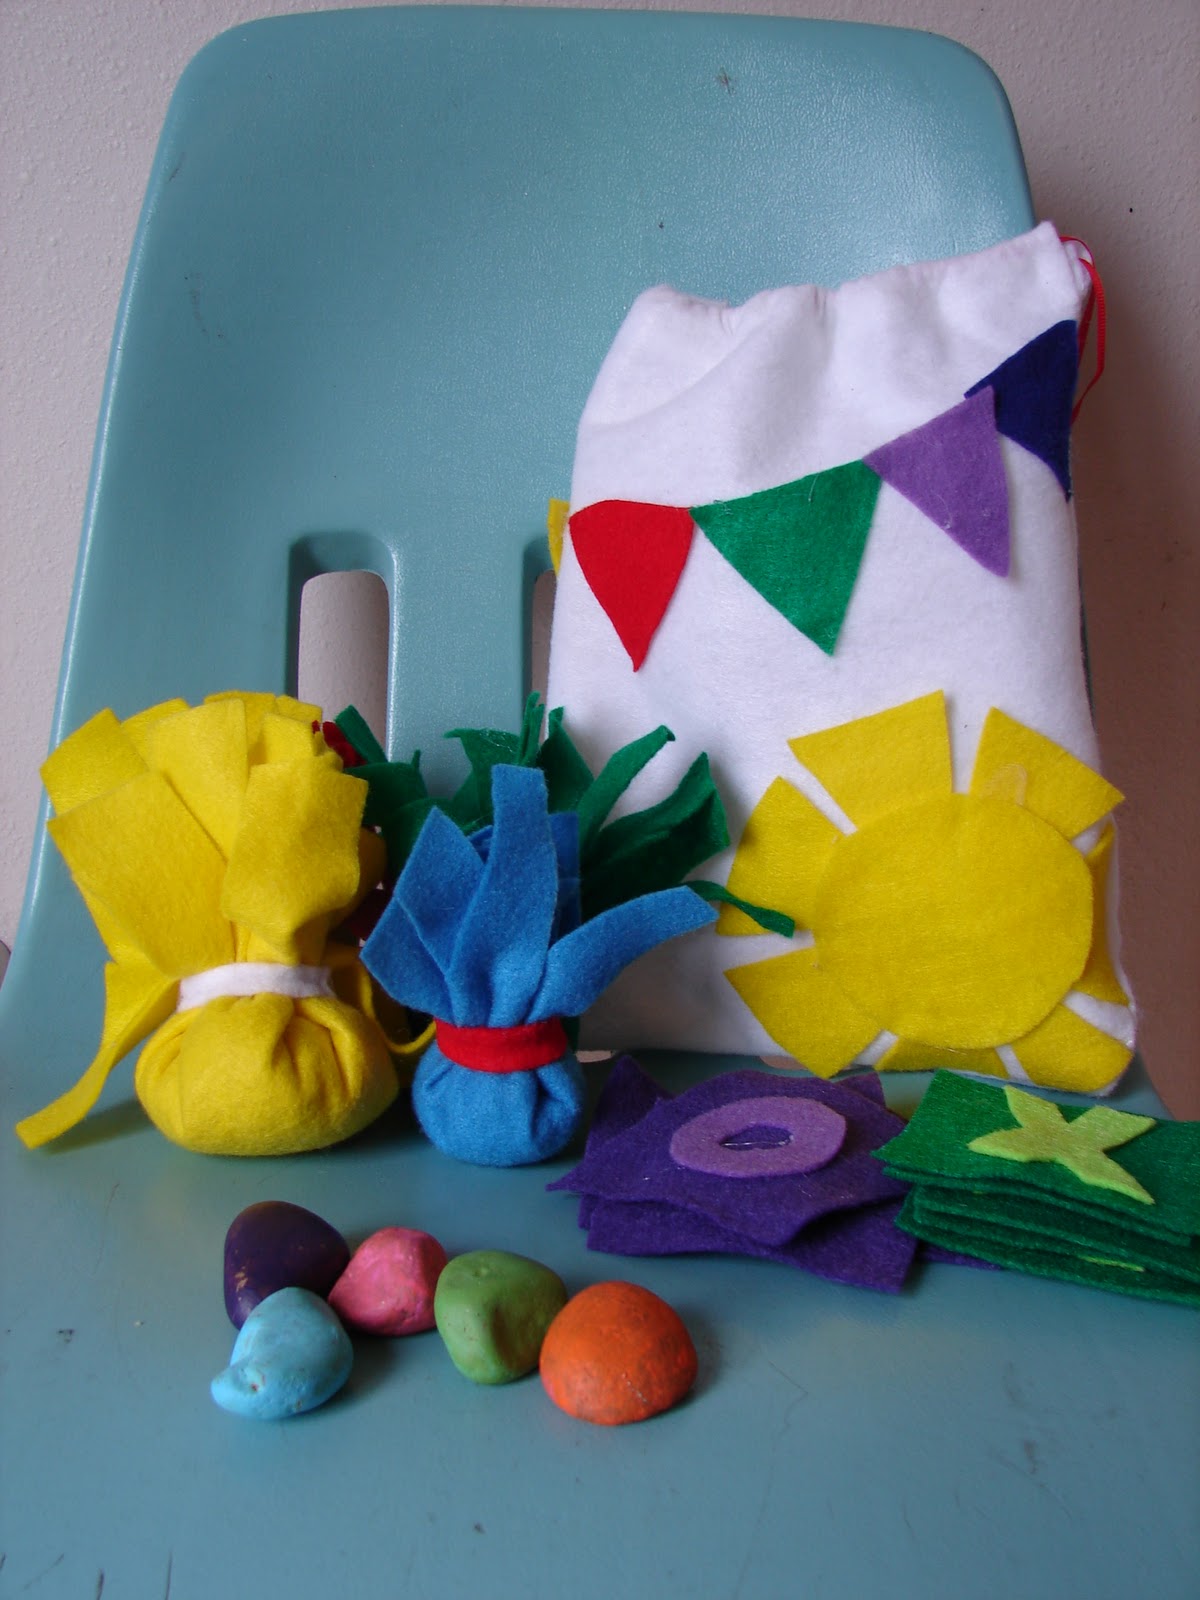
Step 4 : Decorating your indoor hopscotch mat and rocks
So, this is where you could’ve stopped, but I’m just a bit extra!
I had all these leftover scraps…and I hate letting things go to waste…so I started cutting circles.
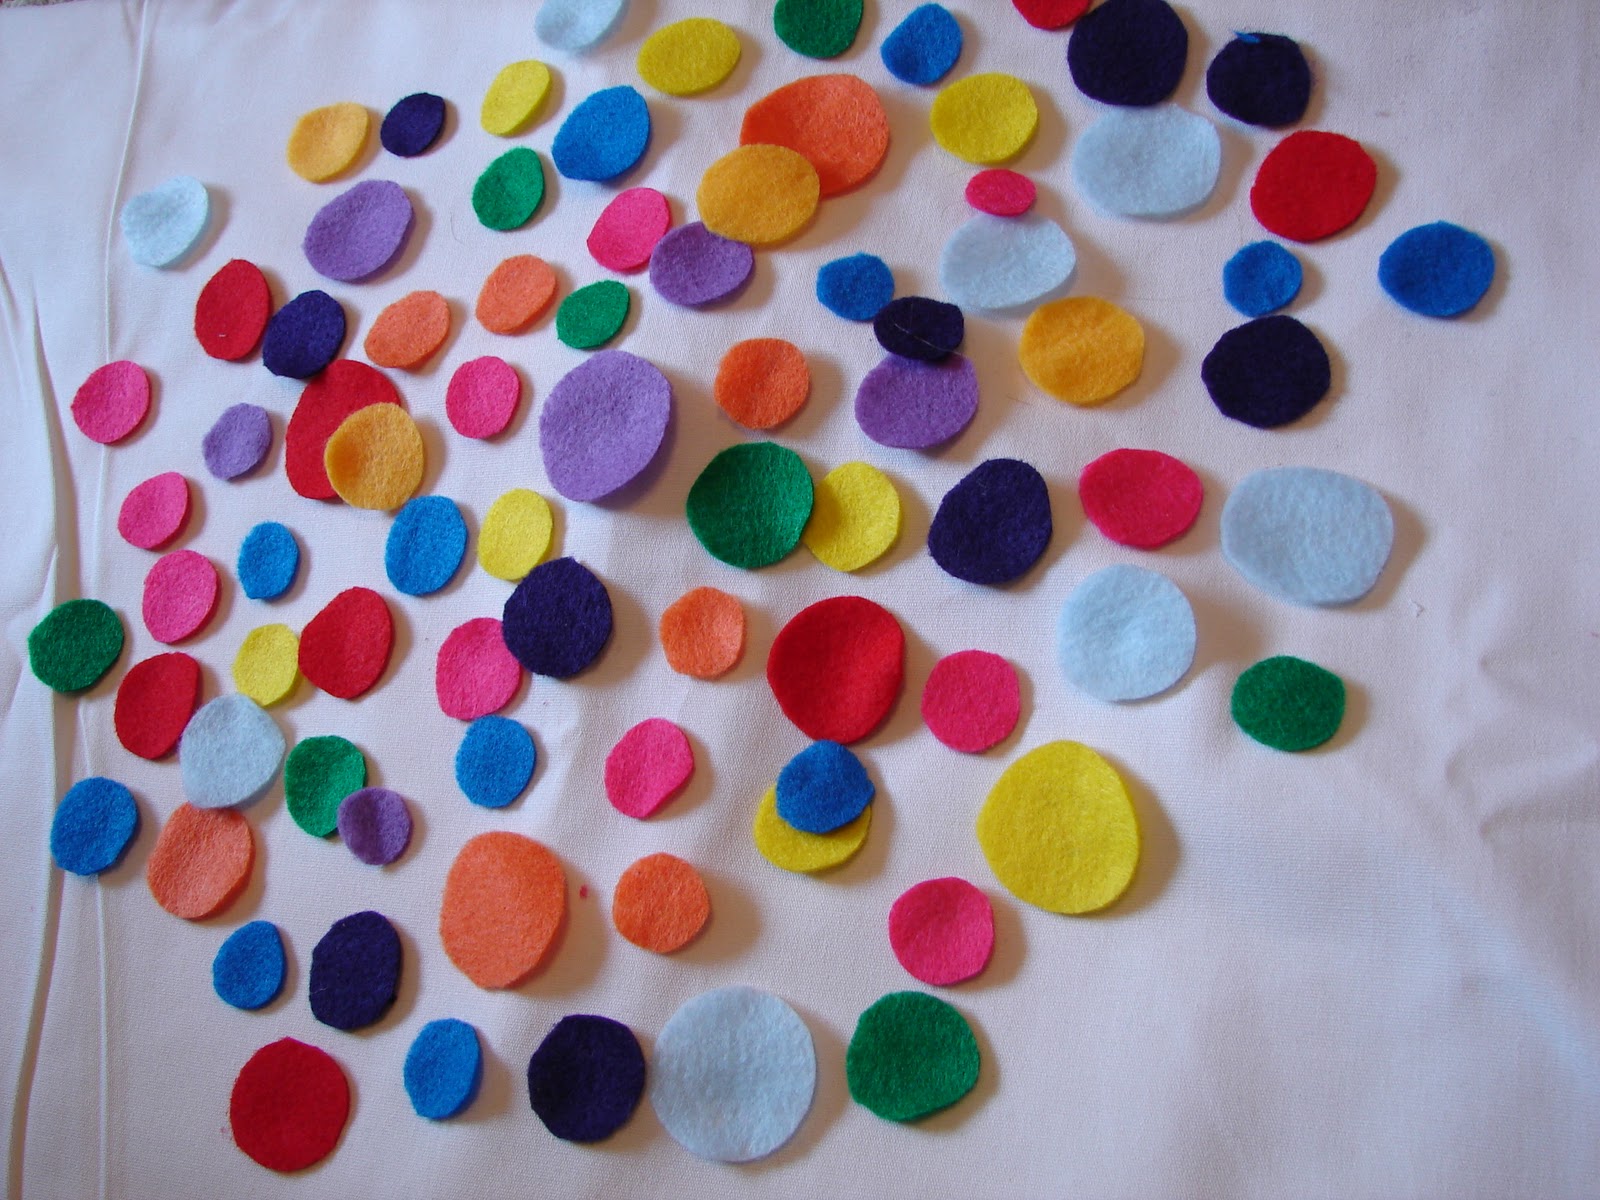
I then added them around my mat as a funky border.

You can also decorate it anyway you want! Maybe if you go for a theme like flower garden or outer space! You could make cute little felt flowers or planets! Or painting them along the sides.
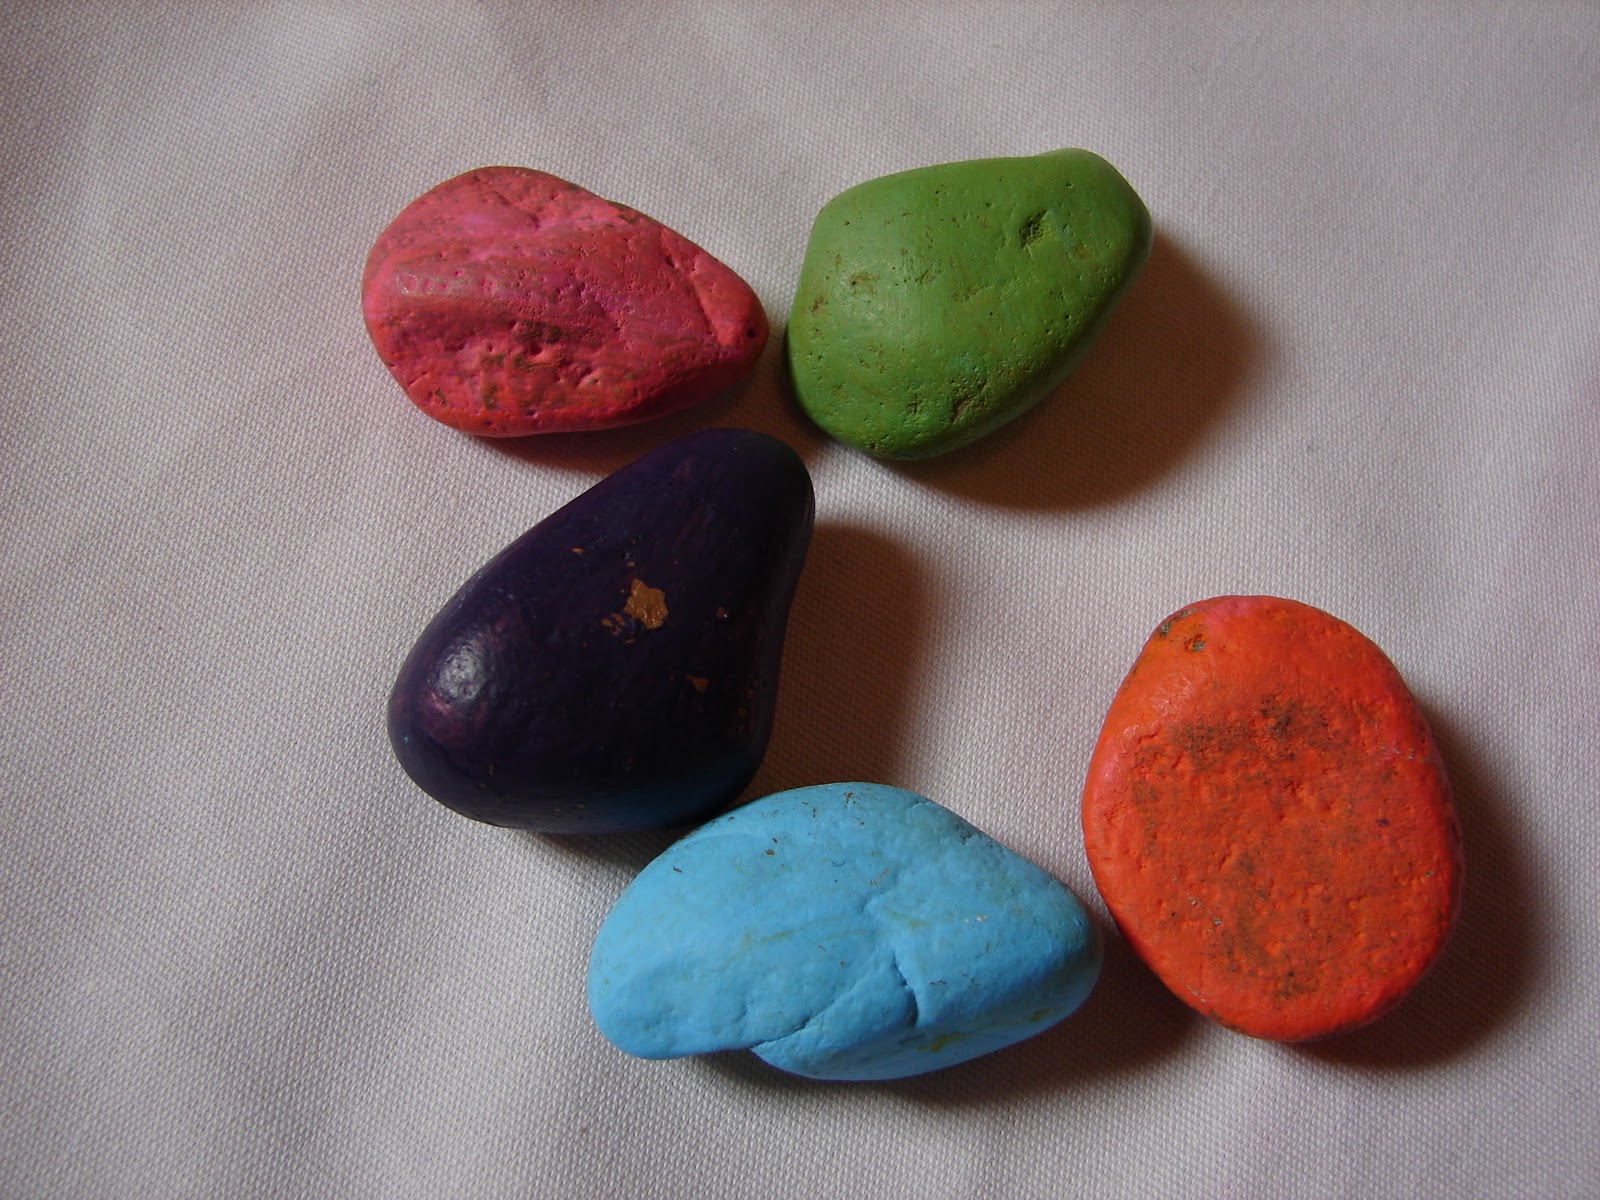
Then to keep my kids involved, we got some rocks from outside and got to paint them!


We just did solid colors, but you can also be more decorative with them and add stripes or polka dots!
Step 5 : Jump around on your DIY Indoor hopscotch mat

We moved some furniture to the side and had my kids go to town!
Since we had this indoor hopscotch mat set up in the kitchen, the mat was a bit slick on the floors! To prevent this, just use the rug grippers underneath or just some tape.
Once you’re done (and out of breath from jumping) you can just fold it up nice and small.

You can also roll it up!

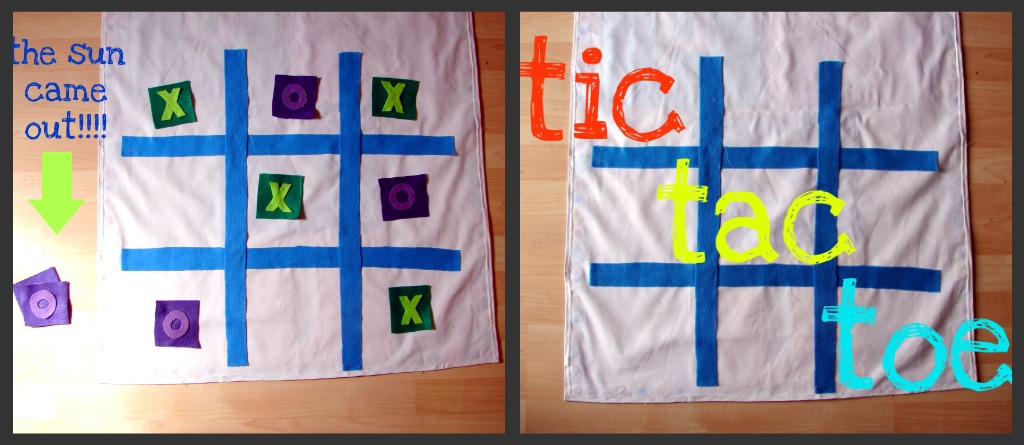
Adding more games to the back of your DIY Indoor hopscotch mat
I did a tic tac toe board and a little target practice area! Some other activities you can add are:
- A map/town for your cars
- A zoo for littlest pet shop toys
These are easy to make with your leftover felt fabric!

The tic tac toe was just some strips of felt and then some x and o’s on small square pieces of felt. I’m still using hot glue for this, of course!

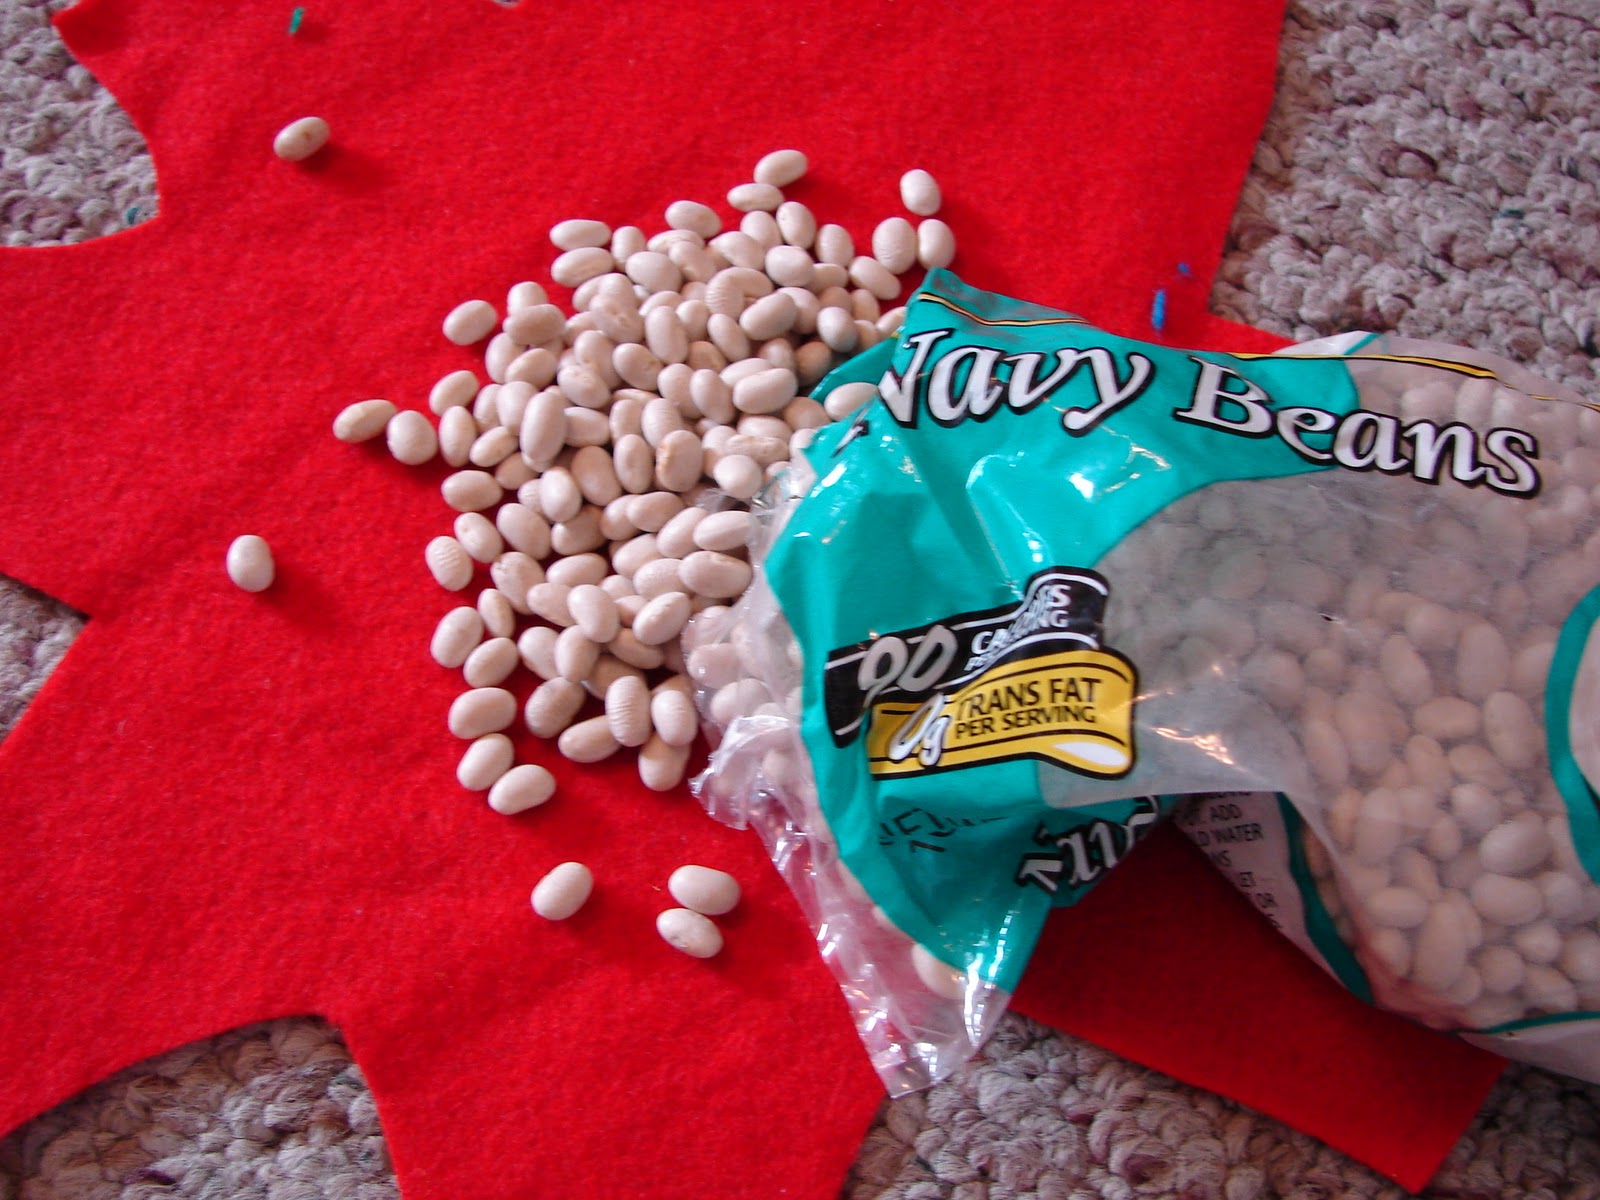
For the target, it’s just some “pieces of pie” cut out and then I cut out some numbers to glue onto them.

For the “bombs” (that is what my son calls them) I just cut out some asterisk shapes.

Fill them up with some beans and then glues the sides up.


To wrap it up, I used a rubber band, glued some felt around it, and then snipped some pieces to make it poofy!
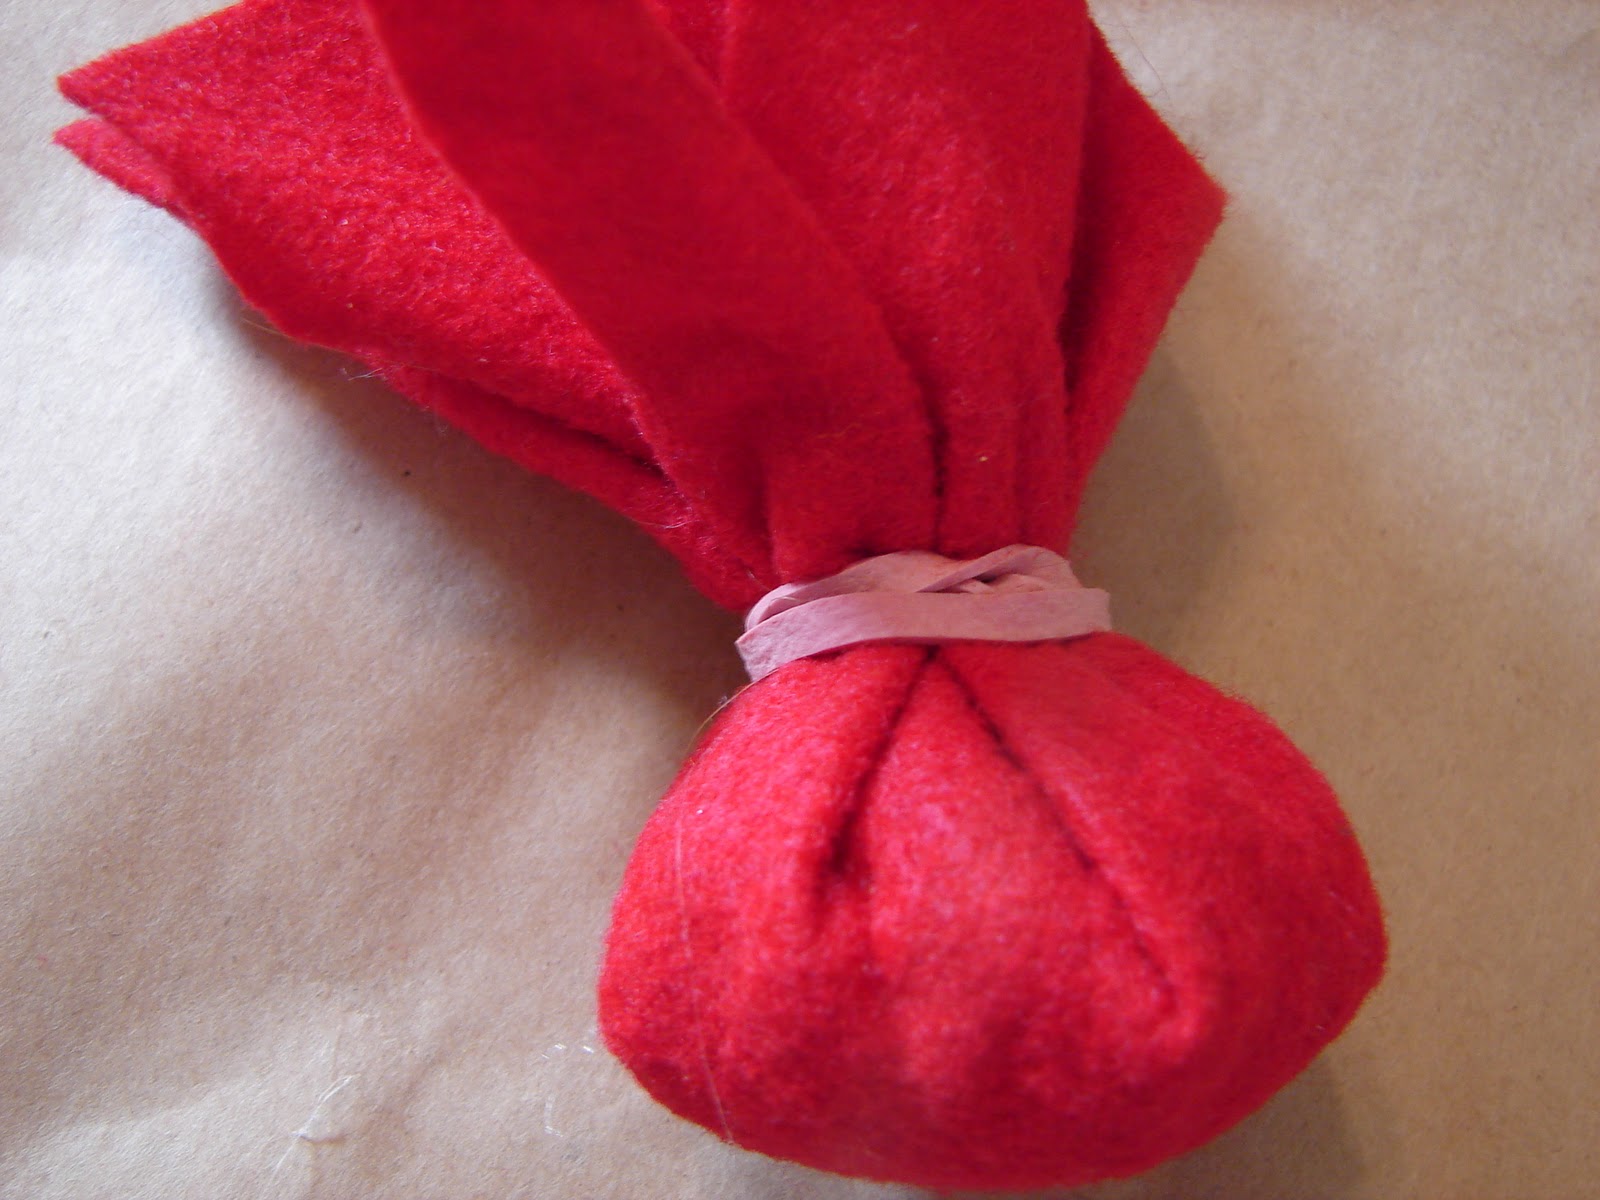


I made some in a few different colors!

To play, you just stand at the top of the mat and toss them and if they land on a number…they can add them up and the one with the biggest number wins (did you see what I did there….I added some math…and the kids will have so much fun playing that they will NEVER KNOW…{insert evil laugh} it’s like when you grate carrots and put them in brownies! little things that make us feel like we are winning the parents vs kids game.
Putting it away
Once I had my DIY Indoor hopscotch mat and games finished, I made a hot glue felt bag to hold all the pieces in it ( I should have made it bigger to hold the mat too….you live and learn)

For making this bag I first decorated the front of the bag with more leftover felt.

I glued the sides together.

Then I folded down the top edge and added a string.

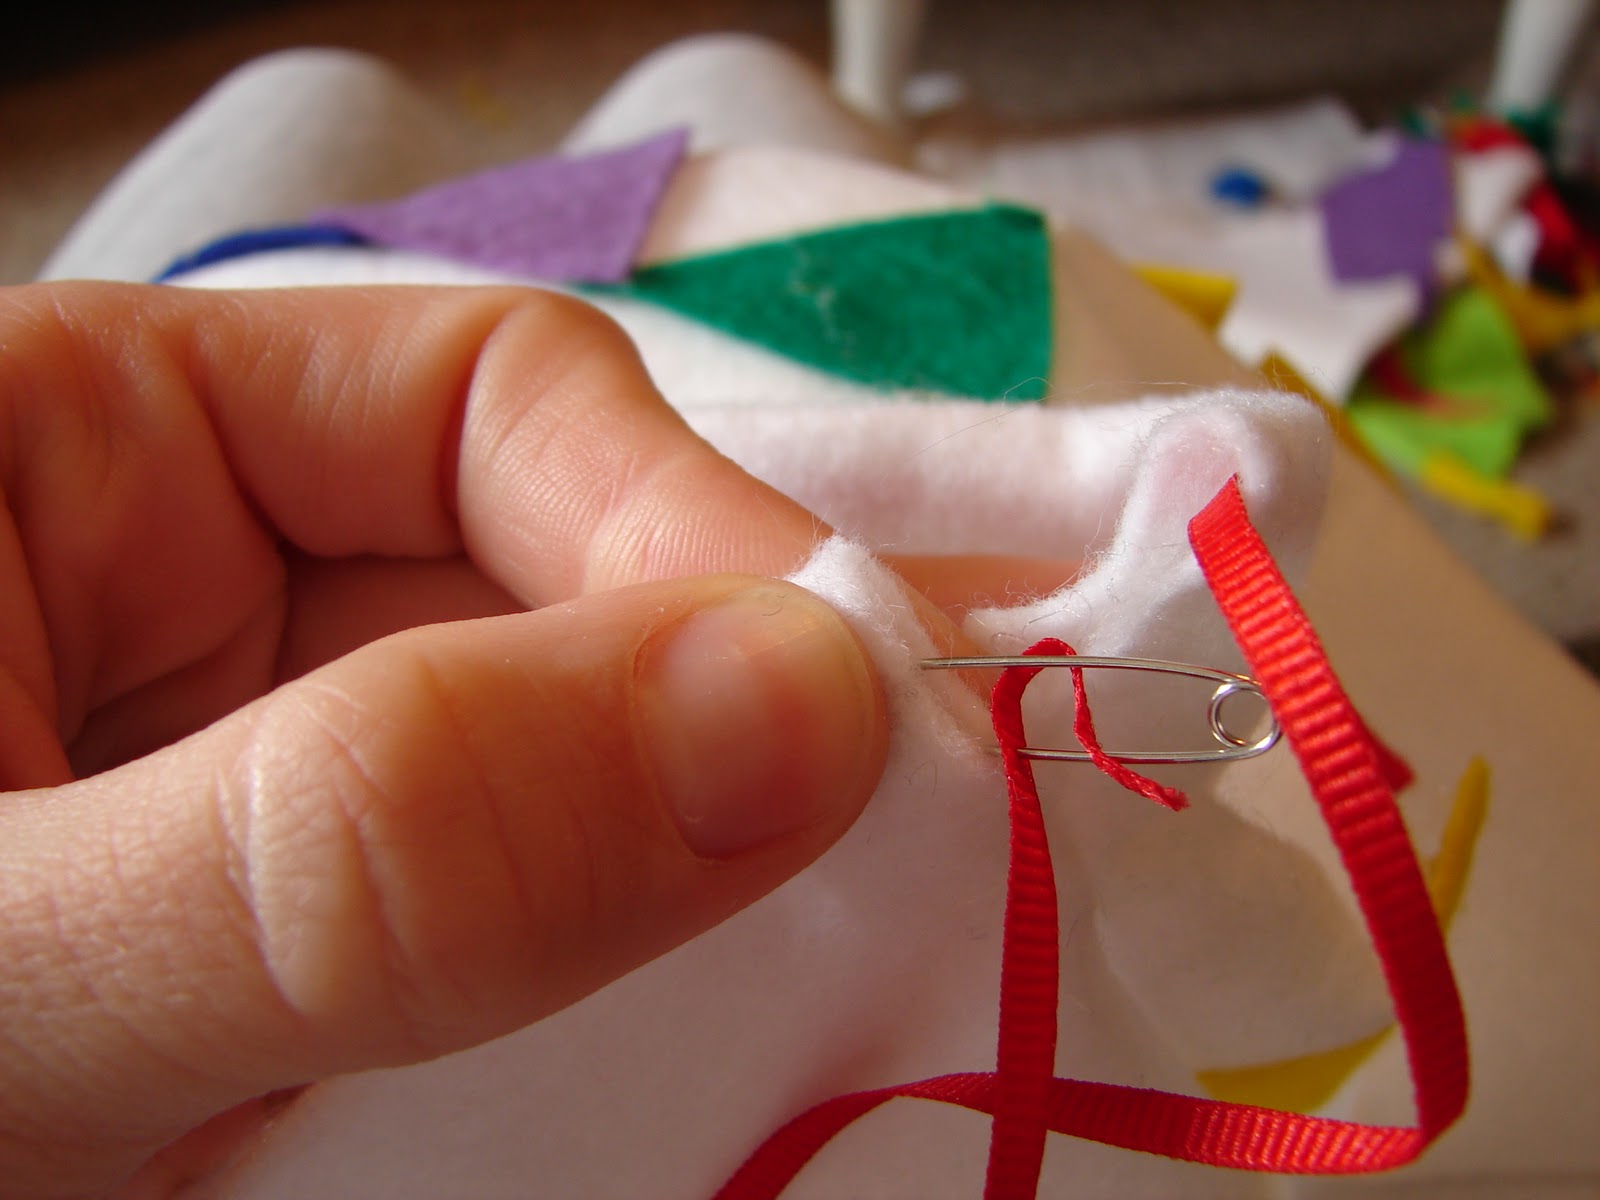
Your indoor activity bag is now all finished!

All wrapped up and stored in a closet. Ready for the next cold day!

Save this DIY Indoor hopscotch mat for later
Too busy to get crafting today? No problem! Pin this post to remind yourself about this project later! Sharing my projects helps me reach more people, allowing me to continue sharing free content!
Too busy to get crafting today? No problem! Pin this post to remind yourself about this project later! Sharing my projects helps me reach more people, allowing me to continue sharing free content!

You might also like these projects:

This project is part of my Kid’s Craft camp! Make sure to click on the image to see all 50 craft ideas!
Gift ideas
- Happy birthday kleenex box idea
- Cupcake sock gift idea
- Peachy gift with free printables
- Clever ways to give money as a gift
- BERRY cute gift
- You’re one in a million (with candy!)
- Colorful gift
- butterfly gift
- Nail gift idea
- Ice Cream gift
END OF BLOG POST-
Carissa says
So cute! My little one would LOVE this! What a fantastic idea!
twilkerbug says
That is awesome! I love it! While I was looking at the kids playing hopscotch I said to myself, 'one could put some of that rubbermaid shelf liner stuff, to keep the game mat from slipping' (if that's an issue)
Kristy says
Very fun! 🙂 I recently made a tic tac toe mat and my kids loved it and even mentioned a hopscotch version, so I might just have to do this! It turned out great btw!
Laura says
Doesn't the fabric move around when the kids jump?
Mrs. Ohtobe says
Ingenious! If you have issues with it slipping around put some puffy paint squiggles on the back side – that should do the trick!
Lyss says
I didn't know you could hem and 'sew' with hot glue! This opens a whole new world of possibilities. Hmmm…
Shay says
Best. Idea. Ever.
Jamie Lynn says
Love this! I'm a kindergarten teacher and this would be GREAT for indoor recess! Thanks for the great ideas.
Aimee Steckowski says
i am in LOVE! saw this on nat's napsack…. will be following along now!!!
Cami @ You Seriously Made That says
This is adorable! I'm glad you did both the front and the back! It looks amazing. I especially love the bag to hold all of your pieces.
Alison@Oopsey Daisy says
Kimbo, you are my hero!! I love this!! Featured it on my blog today:
http://www.oopseydaisyblog.com/2011/07/wednesdays-wowzers-join-me-on-pinterest.html
Thanks for inspiring!
~Alison
Artistic31Mama says
Thank you so much for sharing this!! What a WONDERFUL gift idea as well as some great games for rainy days!! I think I may just make this for my nephews birthday at the end of this month!! This is going on my crafting "To-Do List" Wonderful idea!
Kathie says
Wow, wow, wow—this is pretty much amazing. I need to go to JoAnn's pronto! Thanks for sharing!!
Courtney Adkins says
I just posted about the mat I made for my daughter!
http://theadkinsfamily1.blogspot.com/2011/08/hop-scotch-mat-tutorial.html
So adorable! And pretty easy to make! Thanks SO much for a great idea!
Courtney
Anna Disorganizzata says
Very very very nice!
I'll start to prepare it for the next automn play (during the raining days!!) Thank you very much
Jennifer Dawn says
Cute! I am going to have to make one of these mats. I pinned this idea on Pinterest.
Laks Pravin says
i loved it so much i made a valentine version of it ..Thanks kimbo for the idea.. My kids love the mat.You can see my mat at
http://laks365.blogspot.com/2012/01/valentine-hopscotch.html
Sailing with bare feet says
I love your makings !! Super fun idea's !!!!
Kimbo West says
i actually sold it….but the lady that bought it said that she loves it and would buy more for gifts if i wanted to make some more! so i'm going to assume it held up awesome!
Karalyn Marzo says
Hey I just found your cute hopscotch mat and was wondering how it's held up? Just deciding if I want to use felt or not? Thanks.
Kimbo West says
not at all!!!!
Michelle Asworth says
Such a great idea! I love it! I was wondering if the games on the back interfered with the hopscotch game (making it lumpy???)
EMMA says
Brilliant!!! and no sewing. I will be 'finding' all the necessary supplies the next time I'm able to drive down to the 'big' town (can't buy anything here in Chamonix apart from skis and ice axes).
Janette says
This is so perfect! I can't tell you how much I love your ideas! You're saving me a ton of money this Christmas! You're a saint! 🙂
o says
hi
thanks for the idea. what is the sheet’s length?
Kimbo says
the hopscotch is about 30 inches wide by 72 inches long…..
o says
thanks
Peggy says
Nana will make one for the Grandchildren. Thank you for sharing,
Kristin says
I am working on making this mat right now!! Did you wash and dry your fabric before starting? I was thinking it would be a good idea but I suck at crafts so this would for sure be something I would screw up haha!!! Thanks!
Kimbo says
i didn’t…but if its a fabric that can shrink you might want to prewash!
Uzma Nabeel says
Wow what a fab idea! I will make one of these for my lil one too, thank u for the inspiration x
Allison says
On the hopscotch mat. Awesome idea!! I’m definitely doing this and on the vacuum cord, never ‘should’ on yourself!!! You are doing lovely things for your children AND sharing your ideas with the world!! Who cares about a little dirt 😉
Thank you!!
kathy says
I love this idea especially after you pot the games on the back. I was a little worried about the kids throwing rocks inside so we’ll use the birdies you designed for the bullseye Thank you
kathy says
Kathysteele2006@gmail.comly after you pot the games on the back. I was a little worried about the kids throwing rocks inside so we’ll use the birdies you designed for the bullseye game
Thank you
bubbaboy9 says
THIS IS A FANTASTIC IDEA. I made it and made a large bag to hold all the extras. It did take some time but well worth it. My niece loved it. Thanks for the idea.
Amanda says
Hey girlfriend! 🙂 Just wanted to let you know I shared this on Facebook, it’s so FUN! https://www.facebook.com/CraftsbyAmanda/photos/a.353593675216.349539.323548680216/10154334164050217/?type=1
Maureen says
I am a teacher and a crafter, Love your idea especially that it is two sided. I have some suggestions.
1) use the things you use for the toss game for the hopscotch. You can put the beans in a snack size ziplock in case the felt springs a leak.
2) use 1 or more “mats” that go under rugs to keep from slipping.
3) you can “slip” in all kinds of math add you own points, subtract one or more “other” player points, could do teams
4) you could have a small bag for parts and use ties to attach the rolled up board.
I plan on trying your two sided games and I thought of doing this on those floor tiles that connect like puzzle pieces (they don’t slide). Wonder if you could make different games by assembling the puzzle differently??? Guess ‘ll see. 🙂
Thank you for the ideas.
Kimbo says
so many great ideas!!!! thanks! let me know how yours turns out!!!
Jessica says
I love this!! What a great idea! I was already sold and then I saw that it was two sided! Amazing!
I’m putting together a round up of DIY crafts on my blog and wondered if you’d be willing to let me use a picture with your link. Thanks!!
Kimbo says
of course!!! and thanks!
Jessica says
Thank you!
Jessica says
Hi! I just found this via pinterest. Such an awesome idea!! I’ve got a twister mat that I’m going to do this on the back side of. Thanks for the inspiration!!
Kimbo says
awesome! love the upcycle idea!
Susan Chaya says
I realize that this post is from a few years ago but I am wondering if you can answer some questions. I am looking for approximate sizes of the squares for hopscotch, and the bulls eye pieces
. I hope you can help.
Kimbo says
the hopscotch squares are about 8 x 11 and the bulls eyes is 18 inches!